Search Me

Showing posts with label 11 Desserts and Snacks. Show all posts

Saturday, June 20, 2020

Sheila's Never Fail Perfect Pie Crust


I've had some requests for Mama's never fail, flaky perfect pie crust. The woman can make a pie crust I'm here to tell you. Her made from scratch chocolate pie using this crust recipe is to live for (I say live rather than die because you are going to want a second piece. It's easy and hard to mess up.  Enjoy!       - Tom


Ingredients:

4 cups flour
1 tbsp sugar
2 tsp salt
1 1/4 cups shortening
1 tbsp vinegar
1 large egg
1/2 cup water

Directions:
  1. Put first 3 ingredients in large bowl
  2. Mix well with fork
  3. Add shortening and mix with your hands until crumbly
  4. In small bowl beat water, vinegar and egg
  5. Combine the two mixtures, kneading with hands until mixed
  6. Divide dough into four or five portions and shape into round flat patties
  7. Chill at least 1/2 hour
  8. May be frozen if individually sealed in plastic wrap or ziplock bag
Summary:

Makes 4 or 5 crusts. I've used this recipe for more than 30 years and never had it fail. I use my hands to mix the dough because the more gently you mix it, the flakier the crust will be. When you are ready to make a pie, thaw (if frozen) and roll our with rolling pin. There are tools to make the fancy edges with or you can do it the old fashioned way by pinching the edges to make a nice looking edge.

Sheila  

Saturday, June 6, 2020

Chocolate Peanut Butter Oatmeal No-Bake Cookies


Pat Fine's No-Bake Chocolate Peanut Butter Oatmeal Cookies

 Pat Fine was Sheila's pastor's wife back in Monroe, Louisiana when she first became an Adventist. Pat gave her a whole pile of recipe cards and there is not one of her recipes that is NOT fantastic.
Sheila was having a sweet tooth and I dug out one of Pat's cookie recipes. It was really easy and quick. It would be difficult to screw it up.

How to do it!

Pour all this stuff into a saucepan, stir and bring to a boil. Boil for 1 minutel
  • 2 cups sugar
  • 2 Tablespoons cocoa
  • Dash of salt
  • 1/2 cup milk
  • 1/4 cup butter
 Add the following ingredients to the saucepan and stir until it's melted into the mixture.
  • 1 teaspoon vanilla
  • 1/2 cup of peanut butter
Mix in well...
  • 3 1/4 cups of oatmeal 
  • 1/2 cup nuts
Drop by spoonfuls onto waxed paper. Let sit until firm. Store in a cool place. Makes a cookie jar full.

These things are really really good and have some pretty good stuff in it.  Enjoy.

Tom & Sheila King

Monday, April 8, 2019

Sheila's Bread Pudding


This is some stuff to make you sigh in contentment. I grew up eating bread pudding as a dessert. Mom made it in order to efficiently use aging bread as a dessert. This is not low calorie, low fat or gluten free.  It is, however, chocked with wonderful memories for me.  This is my Sweet Baboo's version drawing from several of our female ancestors' versions.

It makes a very nice transportable dessert since it lies flat in a casserole dish covered by plastic. Easy to heat. Delightful to eat.  I even make it sometimes with whole wheat bread to give you some fiber.


Ingredients:
  • 5 cups cubed white bread 
  • 3 eggs 
  • 1 cup sugar 
  • 1/2 cup melted butter 
  • 1/4 to 1 cup milk 
  • 1/2 tsp nutmeg 
  • 1/2 tsp cinnamon
  • 1/2 to 1 cup raisins (optional) 
Directions: 
  1. Cream butter, sugar and eggs 
  2. Add 1 tsp. each -vanilla and almond flavoring 
  3. Mix in bread 
  4. Add enough milk (up to a cup or so) to make the bread mixture mushy 
  5. Press it into a greased casserole dish 
  6. Bake at 350 degrees just until set. 
  7. Serve warm, room temperature or even cold with lemon sauce. 


Lemon Sauce: 

  1. In 1 quart sauce combine:  1 1/4 cups water, 1/2 cup sugar, 2 tsp grated lemon peel, 1/4 cup lemon juice, 1 1/2 TBSP corn starch. 
  2. Mix well. Cook and stir until thickened. 
  3. Then stir in two tablespoons butter or margarine Makes 1 3/4 cups sauce 


Serving Directions:

That's it. To serve, just plop a big old spoonful of this stuff in a bowl, pour some lemon sauce over it, and enjoy. The ingredients are sort of a medium version. You may want to adjust spices or ingredients to your tastes. There's a bit of "the hand of the chef" in this stuff. I even use whole wheat bread in mine. I tear up whatever bread is laying around including burger buns and hot dog buns. Bread is bread. And I double the lemon sauce because I like lots of sauce, but then that's me. Feel free to ignore any of my alterations. Mom's Bread Pudding never fails.

Sunday, December 23, 2018

Honeymama's Christmas Fruitcake

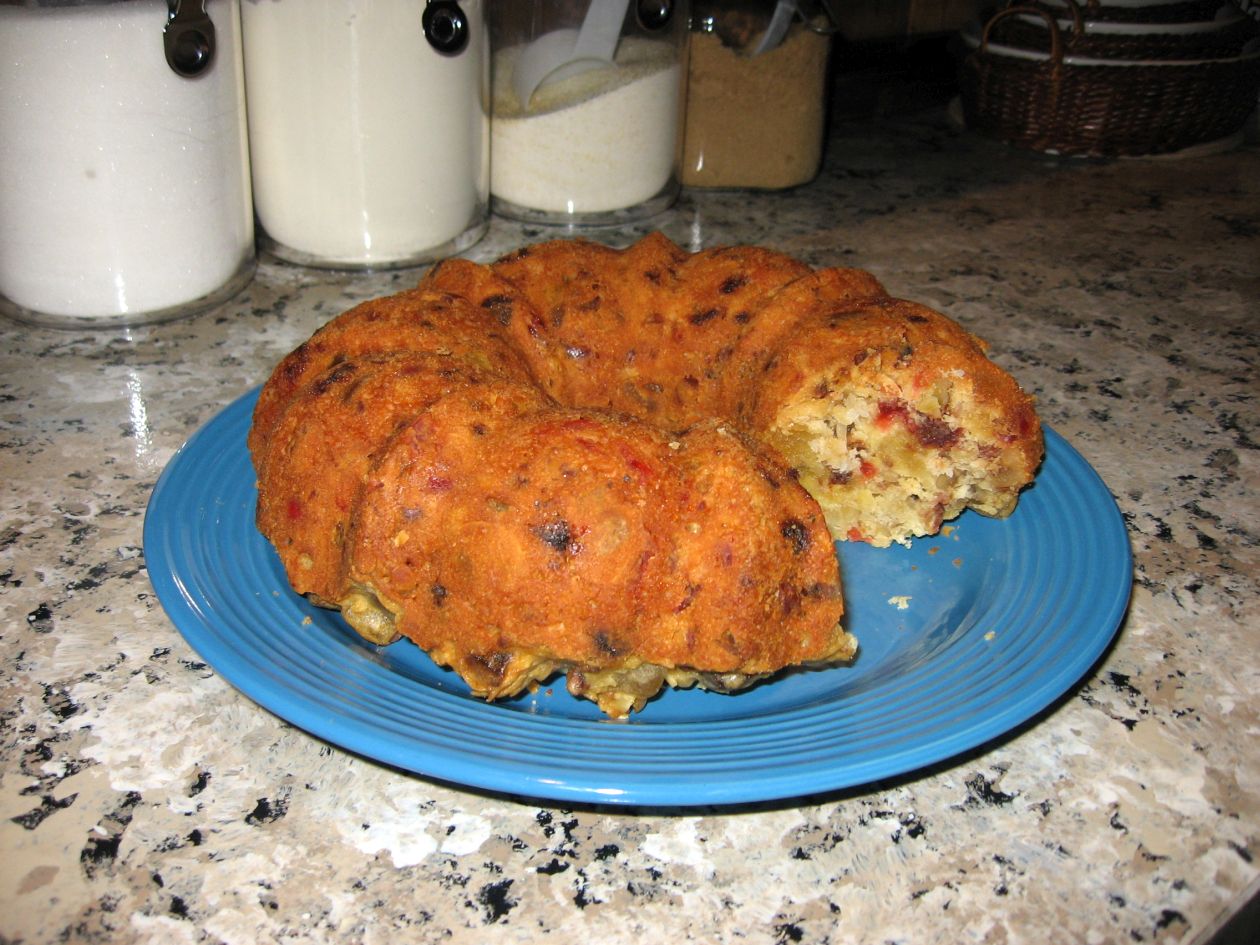
As usual, we hit that thang before I could run get the camera.


My grandmother, "Honeymama" as she was known by us grandkids, used to make her Christmas fruitcake every year sometime in November. By the time I first sampled her fruitcake, a firm tradition had been established. Every year the first piece of fruitcake went to my Aunt Sandra, her second child. None of us could touch the fruitcake till Sandra had eaten the first piece.  Aunt Sandra lived a good hour or two drive from Keene up on the prairie west of Springtown, Texas, north of Weatherford so she only came down once a month or so to check on her Mama.

One year, not long after my Grandfather passed away, Aunt Sandra got busy with business affairs and didn't come and visit her mama as often as Honeymom thought she ought to. I was sitting in her kitchen a few days before Thanksgiving, looking covetously at that fruitcake when all of a sudden my grandmother stood up, pulled a big knife out of the drawer and approached the fruitcake muttering darkly.

"If she can't be bothered to come visit her mother, I know someone who will appreciate a piece of fruitcake.

I couldn't believe it when she plunked a thick slice of fruitcake and a tall bottle of Dr. Pepper down in front of me. With a twinkle in her eye, she winked at me and went back to her early Thanksgiving preparations.

Honeymom gave a copy of her fruitcake recipe to Sheila years ago. I still have the handwritten copy. Apparently Honeymom got the recipe from "Aunt Dora", whoever that was. I should check the family tree to see who she was I suppose. Anyway, Sheila tweaks it a bit and no two fruitcakes come out exactly the same but they are all addictively delicious. She made two this year, the first with chopped dates which lasted about two weeks. The second time we didn't have dates so we made it with craisins (dried cranberries).  Feel free to have fun with the ingredients. It's a very forgiving recipe. I think the secret is that neither Aunt Dora, Honeymama, nor Sheila use citron in the recipe. It's a nice mild fruity and dense moist cake. I can't resist it.

Ingredients:  
  1. 4 eggs
  2. 2 cups sugar
  3. 1 cup melted butter
  4. 1 tsp. baking powder
  5. 2 1/2 cups flour
  6. 1 cup milk
  7. 1/1/2 cup walnuts or pecans
  8. 1 cup chopped dates, raisins or craisins
  9. 2 small boxes or 1 large box chopped candied pineapple 
  10. 2 small boxes or 1 large box candied cherries
  11. 2 cups grated fresh coconut
  12. 1/2 cup flour (dusted on fruit)
  13. 1 tsp vanilla extract
  14. 1 tsp almond extract 
  15. 1 tsp butter flavoring
  16. Spices to taste (nutmeg, cinnamon, cloves, ginger, etc.)
Directions:
  1. Preheat oven to 300 degrees
  2. Mix eggs, sugar, butter, and baking powder till smooth.
  3. Add 2 1/2 cup flour and milk
  4. Chop nuts and all fruit and toss in a large bowl with 3/4 cup flour
  5. Mix coconut into fruit mix
  6. Add spices till the batter tastes like you like it.
  7. Stir all together in a large bowl and fold into a large bundt cake pan (or a normal size bundt pan and a loaf pan) coated with butter
  8. Bake at 300 degrees for approximately 1 hour until a knife inserted into the cake comes out clean.
Serving Suggestions:

This recipe tends to run over the top of our bundt pan, so we put some of the batter in a loaf pan and made a "giftable sized fruitcake" (right) and avoided having to clean fruitcake batter off the oven racks. One hint given to us by seasoned fruitcake bakers: Fruitcake tastes best if you let it sit for a few days in a cool corner before you eat it. Wrap it in plastic and hide it from yourself. It's the only way it's going to make it more than 12 hours without you losing control and chopping off a hunk of it. My Honeymama used to let hers sit for up to two weeks or until Sandra showed up for her first-of-the-season fruitcake.  Serve with milk or either Coke or Dr. Pepper in the traditional bottle.

If you can bear to give away the smaller fruitcake, cut it in slices after it cools, then put the slices in one of those plastic gift boxes or cake tins. Walmart sells them in the Christmas wrap section. Just slap a bow and a tag on it and you have a fantastic gift most people with working tastebuds will love.


If you think you don't like fruitcake, you might want to try this fruitcake. The lack of citron really makes this a lovely collage of gentle, tasteable flavors and a tribute to the culinary genius of Aunt Dora, my Honeymama and my Sweet Baboo!
 
If you find you don't like this fruitcake, box it up and mail it to "Uncle Tom's Home for Homeless Fruitcakes".
We'll make sure your unwanted fruitcake will achieve its ultimate purpose in the grand cosmic scheme of things.

© 2018 by Tom King

.

Saturday, April 21, 2018

Sheila's Homemade Banana Pudding


This dessert is a sure potluck hit. You should double or triple the recipe. It looks nice in a big yellow mixing bowl which I recommend everyone get because, well, everyone should have a big yellow glass mixing bowl. There are easier ways to make banana pudding, but no Jello mix can quite compete. You can't make it like this out of a box. Between the cooking time, the assembly time, and making up the topping, it can take an hour to put it all together. It’s very much worth it. It’s easy to double or triple the recipe. You just have to be really careful keeping it stirred while cooking a very large batch so it doesn’t burn on the bottom of the pot.

Ingredients

Pudding

  • 1/2 Cup Sugar or you can substitute Stevia or something like that to lower the calories. You just have to change the prep a bit.
  • 1/3 Cup Flour or ¼ cup corn starch
  • 3 Egg Yolks, Save the egg whites for making meringue if you plan to do that.
  • 2 Cups Milk
  • 1 Box Vanilla Wafers
  • 5 Bananas
  • 1/2 Teaspoon Vanilla (a bit more if you use something beside vanilla extract)
  • A dash of salt
Meringue:
  • 1 Teaspoon Cream of Tartar, for making meringue
  • 3/4 cups Sugar, for making the meringue
  • 3 Egg Whites, for making meringue
  • Alternate topping – large tub of Whipped Cream or Cool Whip
Directions:
  1. In a large pot or saucepan, mix flour, egg yolks (beaten), milk and salt. If using sugar add it now. If using artificial sweetner, set it aside till after the pudding is cooked as heat will kill the sweetness.
  2. Heat over medium eat, stirring constantly with a wire whisk. It takes around 15 minutes for the pudding to thicken. Don’t let it scorch.
  3. When the pudding thickens and begins to bubble, remove it from the heat and set it aside to begin to cool. Add vanilla when it's cooled a bit and stir it up good.
  4. In your big yellow mixing bowl, place a layer of vanilla wavers in the bottom of the bowl. If making a double or triple batch, make sure you have an extra bowl or a really, really big bowl.
  5. Slice bananas and cover the layer of cookies. Alternate cookies and bananas
  6. If using artificial sweetener (which will cause diabetics in the group to kiss you feet) stir the sweetener into the pudding. Just follow the replacement amounts on the box of sweetener. At any rate, with your pudding ready to go, every few layers, spoon the pudding over the cookies and bananas. Add more cookies and bananas and pudding layers until you fill up the bowl. 
  7. At this point you should preheat the oven to 350 degrees if you are doing meringue. If you are doing Cool Whip skip to step #13.
  8. Place all the egg whites in another mixing bowl. Add a teaspoon of cream of tartar and 3/4 cup of sugar or sweetener two tablespoons at a time while beating the egg whites. It could take up to 15 minutes.
  9. Continue whipping egg mixture till it forms stiff glossy peaks.
  10. Pour meringue mixture over the top of the banana pudding; spread it out over the bowl. Dab at the top of the meringue with a spoon till curly peaks form.
  11. Set the pudding on a baking sheet and bake in the hot oven till the peaks begin to brown.
  12. Remove the pudding and allow it to cool to room temperature, and then chill in the refrigerator. Do not put hot meringue straight out of the oven in the refrigerator. It will collapse as I discovered the hard way.
  13. If you’re doing Cool Whip instead of meringue, wait till the pudding cools at least to slightly warm and then spoon whipped topping over the top of the pudding. At this point I add cookies in decorative patterns on top of the topping.
  14. Cover with plastic wrap and refrigerate.
  15. You may have to padlock the refrigerator door while the pudding is cooling. Otherwise, you may get up Sabbath morning and find a big hole in your pudding.
Serving Suggestion:
This part’s simple. Pull off the plastic, stick a big spoon in it and get out of the way. I promise you that you will be taking home a nice clean bowl.


Friday, February 23, 2018

Fruity Breakfast - Strawberry Compote

I didn't have any whip cream or cherries or this would have been prettier.
 
A nice addition to a bagel breakfast, this strawberry compote is really flexible and easy to make up. You can make a sugar free version by substituting apple juice for the water or adding splenda or Stevia instead of the sugar. Neither holds it's sweetness well when heated up, but it does help allay the tartness of the strawberries. You can use frozen or fresh strawberries. Either way they go mushy when you cook them. You also don't have to use lemons. I was out of lemons so I used a tangerine. You can also use lime or orange juice as well. The flavor is good either way.

Ingredients:
  • 1 pound strawberries
  • Juice of one orange, lemon, or lime
  • 1 tablespoon corn starch
  • 1/4 cup water
Directions:
I use a pie server to scrape the bottom of the pan during
heating to keep it from sticking and burning.

  1. Cut up strawberries and place in pot
  2. Add citrus juice 
  3. Add sweetner
  4. Add corn starch
  5. Add water
  6. Stir over medium heat for 5 to 15 minutes. Stir constantly to prevent burning and sticking to the pot. Bring to a slow boil till the mixture thickens
Serving suggestions:

Tastes great served over waffles, pancakes, bagels, or toast with a bit of whip cream on top if you'd like. If you want to be terribly fancy, add a cherry on top of the whip cream. In the picture above I've served it with cream cheese on a bagel.  You can double, triple, quadruple or more the recipe if you're serving a potluck breakfast with waffles or pancakes to a bunch of hungry academy choir members. Makes a great alternative to syrup. At least you get a little fruit in there that way.

Tom


Thursday, September 28, 2017

Hot Fudge Sauce

If you're throwing a homemade ice cream making party or a banana split party, this great hot fudge sauce recipe is perfect to top your ice cream treats with. My wife got the recipe from a lady in Louisiana name Opal Martin.  Great for sundaes, banana splits and almost anything you’d like to put warm hot chocolate fudge on.  It only takes about 5 minutes to make.  This recipe is why I keep a supply of cocoa in the pantry at all times (this and the chocolate skillet cake recipe). I like more of a milk chocolate fudge myself and sometimes add a few tablespoons of evaporated milk when I make it.  Either way is terrific. Saved me many a trip to the grocery store when the missus gets a craving for a hot fudge sundae.  I keep the leftover sauce in the fridge in some little fruit jars I keep for leftover fudge sauce, sweet and sour sauce, homemade tartar sauce or homemade pimento cheese.You can reheat the sauce for a few seconds in the microwave. It's just lovely stuff.

Ingredients:

  •   1 cup sugar
  •   1/3 cup cocoa
  •   3 tbsp flour
  •   1/3 tsp vanilla
  •      ¼ tsp salt
  •     1 cup boiling water
  •     1 tbsp margarine

Directions: 
1.     Mix dry ingredients together in a saucepan
2.     Add boiling water while stirring
3.     Cook for 3-4 minutes stirring constantly.
4.     Store in covered jar in the refrigerator

Makes 1½  cups.

 Stores nicely in a mandarin orange fruit jar - just sayin'


(c) 2013 by Tom King

Friday, August 25, 2017

Chocolate Skillet Cake

You'll notice a piece is missing. It's hard to get a picture
of a whole chocolate skillet cake. You go get the camera
and by the time you get back it looks like this.
Today's recipe is not low fat, sugar free or vegan.
It goes a long way because it's kind of rich. You
need an iron skillet to cook it properly. I make it pretty regularly, but it never lasts very long. It's a nice moist, crumbly single layer cake. Just leave it in the skillet and server it from there. This one you'll want to take to a potluck sometime for the dessert table. Just cut it in pretty small pieces. Like I said, it's kind of rich.

Cake Ingredients:
  • 1 cup flour
  • 1/2 teaspoon baking soda
  • 1 cup sugar
  • dash salt
  • 1/4 cup (1/2 stick) butter
  • 1/4 cup vegetable oil
  • 2 tablespoons cocoa powder
  • 1/2 cup water
  • 1/4 cup buttermilk
  • 1 egg
  • 1/2 teaspoon vanilla
Frosting Ingredients:
  • 1/4 cup (1/2 stick) butter
  • 2 tablespoons cocoa
  • 3-4 tablespoons milk (as needed for consistency)
  • 1/2 cup pecans, chopped
  • 2 cups powdered sugar
  • 1/2 teaspoon vanilla
Directions:
  1. Preheat the oven to 350 degrees F. In a large bowl, whisk flour, baking soda, sugar, and salt together and set aside.
  2. In a 10-inch cast iron skillet, bring the butter, vegetable oil, cocoa powder, and water to a boil. Remove it from the heat and whisk in the dry ingredients well. Mix in the buttermilk, egg, and vanilla. Bake in the skillet cake at 350 degrees F for about 15-20 minutes or until a toothpick comes out with just a few moist crumbs.
  3. While the cake starts to cool, make the frosting. In a medium saucepan, bring the butter, cocoa, and milk to a boil. Remove them from heat and add the sugar, nuts, and vanilla to the hot frosting mix. Stir to combine. Pour over the warm cake, spread with a spatula, and serve with vanilla bean ice cream, caramel sauce or whipped cream.
Serving suggestions:
  • Ice cream
  • Caramel sauce (this one is delicious!)
  • Whipped cream

Note: 

If you let the frosting boil a bit longer,
when it cools it's like a stiff Hershey bar top.


If you bring the frosting to a rolling boil it will give you a frosting the consistency of a chocolate candy bar as shown to the right. Man, that's just the literal frosting on the cake. Like I said I'm not a big cake fan nor much overwhelmed by chocolate, but this stuff is like catnip for people around our house. I made it yesterday. There are only two of us. I'm a diabetic and can't eat this and there's almost 2/3 of it gone today. I'm taking extra Glipizide. And before you say it, I know. I was weak!

It's as good as it looks.
It's kind of a cross between chocolate cake and a frosted brownie.

Tom


Friday, May 19, 2017

No Sugar Added Apple Pie


This is an experimental Apple Pie which hopefully doesn't send my blood sugar into low Earth orbit. It's made with 100% white grape juice and a sprinkle of Stevia in place of sugar. The apples are fresh. I peeled them with my handy dandy apple peeler and corer machine, a bit of kitchen tool self-indulgence I picked up a year or two ago. The pie is tasty, but not overly sweet. Here's how I made it.

Ingredients:
  • 5 apples peeled, cored and sliced.
  • 3/4 cup of water
  • 1/2 cup white grape juice
  • 1 tsp. allspice
  • 2 tsp. cinnamon
  • 1 tsp. margarine or butter
  • 1 tbsp corn starch
  • 2 tbsp flour
  • 2 pie crusts
  • Spray oil
Directions:
  1. Place water, grape juice, allspice, cinnamon, corn starch, flour, in large pot and heat till blended.  
  2. Add apples to the mix and bring to a low boil.
  3. Spray the pie pan with oil and spread bottom pie crust over the pie pan.
  4. Fill the crust with the apple mix.
  5. Sprinkle the apples mix with Splenda or Stevia. Spread small dots of margarine or butter over the top of the filling.
  6. Spread the top crust over the bottom, flute the edges to seal the top and bottom.
  7. Cut 5 evenly placed slits in the top crust to vent while baking
  8. Bake at 350º until the crust edges and top crust begin to brown
  9. Cool for an hour
Serving Suggestion:

It's really good pie, warm with a dollop of vanilla ice cream (sugar free for me).  It's lightly sweet and the cinnamon and butter makes it pop.

© 2017 by Tom King

Friday, May 5, 2017

Aunt Sheila's 1-Cup Easy Peach Cobbler

Blueberry/peach cobbler variant (makes the batter blueish)


Need an easy-to make potluck dessert? This one is a unique take on cobbler. You can use a cake mix, but I much prefer this rich crusty buttery take on the inimitable peach cobbler. The recipe is really easy to double or triple if you've got a large casserole dish. It's also easy to memorize the recipe.

Ingredients:
  • 1 stick butter or margarine
    Blueberries go in before you pour it if you use them in combo
  • 1 C. milk
  • 1 C. sugar
  • 1 C. flour
  • 1 egg
  • 1 tsp. baking powder
  • 1tsp. vanilla
  • Dash of salt
  • 1/2 tsp cinnamon (optional)
  • 1 qt. fruit, can or jar (peaches, cherries, blackberries, blueberries or combination thereof)

Directions:

  1. Preheat oven to 350 degrees.
    Cover the bottom of the baking dish with melted butter.
  2. Melt butter in baking pan or casserole dish.
  3. In a bowl Mix milk, sugar, flour, baking powder, egg, salt and cinnamon (if desired). 
  4. If you add blueberries to other fruit, add the blueberries directly to the batter. 
  5. Pour batter into the casserole on top of the butter.
  6. Add fruit to the batter, but do not stir it. Let the fruit float on the batter. When you bake the cobbler, the batter will rise up around the fruit and cover the fruit. The butter and the rising batter absorbs the flavor of the fruit.
  7. Bake in preheated oven for 1 hour till a knife inserted in the doughy bits comes out clean and the top crust is brown and buttery.
Serving Suggestions:
Ready to go in the oven.


Serve nice and hot and bubbly around the edges. It's really good with whipped cream or ice cream. I like it with a little evaporated milk, but that's me. It's a really easy recipe and is expandable. Just double or triple the ingredients and use a larger baking dish. Not nearly as hard as a pie-crust cobbler and tastes really crisp and buttery. 


Monday, November 28, 2016

Crock Pot Cake


Here's how to get a nice and very moist cake out of a box cake mix and you don't have to tie up your oven if you've got a couple of casseroles going in there. It takes a little longer, but the cake I made in our crockpot came out really well. You just have to be patient because you can only cook the layers one at a time and they take one to two hours for each layer.  Makes a nice sturdy little cake and you don't have to worry so much about burning it. This is a very forgiving way to bake a cake.

Ingredients:
  • Cake mix or your own homemade cake batter
  • Crock pot
  • Spatula
  • Spray oil or butter
  • Frosting
Directions:
  1. Plug in your crock pot and turn it on high.
  2. Spray the inside with PAM or spray on margarine or rub the inside and bottom with butter or oil
  3. Make up your cake batter just like you normally do.
  4. Pour half of the cake batter into the crock pot. Cover and save the rest.
  5. Cover and cook until a knife inserted into the center comes out clean
  6. Gently run around the edges of the cake with a spatula or narrow pancake flipper till the cake releases from the bottom
  7. Turn the cake out onto a cake plate. Flip it back over and allow to cool.
  8. Meanwhile, respray the inside of the crock  and scoop the rest of the batter into it.
  9. Cover and cook again for one or two hours until a knife in the center comes out clean.
  10. Again, gently loosen the edges of the cake from the pot and turn out on a plate.
  11. Allow to cool, the frost the first layer, place the second layer on top of the first and frost that. The layers may be very moist and so you have to handle them gently so they don't break. They are studier once they've cooled.
  12. Cover and take to potluck with you. Makes nice tall delicious looking pieces. This is the one I made for my chocolate loving sweetie. She was much impressed.

Notes:
 
If you're cooking for a potluck, Thanksgiving, Christmas or other holiday, this method gives you more baking space. It doesn't have to be watched as closely as it doesn't burn as easily as batter in a thin cake pan does.  Just plug in the old crok and get her cooking. I'm going to try a fruitcake in the crock pot this year. I like the look of the bundt pan fruitcakes, but I'm curious to see how my grandmother's fruitcake turns out in the crock pot. I will keep one and all informed. Be sure and follow this blog for updates and new recipes.  If you have some recipes you want to contribute, I'll try them out and post them here giving you full credit, of course.

Happy potlucking!

© 2016 by Tom King

Tuesday, November 15, 2016

Mammaw's Tea Cakes


It's funny how words get misheard and preserved, especially among close-knit cultural groups. I was looking for this recipe in the box of recipes my wife inherited from her Mammaw Jenny. This recipe for old-fashioned Tea Cakes (the kind you have at tea time if you're British, was in an old newspaper clipping along with a recipe for cornmeal pie. It was listed as a recipe for old-fashioned "T" cakes. Not sure what the local newspaper thought the "T" stood for. There was another recipe by someone named Miranda for a "Sheith" cake - or a sheet cake as it is known throughout the rest of the world.  So T-cakes or Tea Cakes, whatever you want to call them, these are a great party cookie that's not very sweet, but just right for a little snack or a light dessert after a big old potluck.

Mammaw's Old Fashioned Tea Cakes


Ingredients:
  • 2 cups flour
  • 1 cup sugar
  • 1 cup butter, melted
  • 2 eggs beaten
  • 3 tablespoons milk
  • 2 tablespoons baking powder
  • 1 tablespoon vanilla
Directions:
  1. Preheat oven to 350 degrees
  2. Mix all ingredients well
  3. Roll dough thin
  4. Cut out cookies with a cookie cutter 
  5. Place cookies evenly on an ungreased cookie sheet
  6. Bake until cookies are a light golden brown. Do not overcook.
Note:

You can also spoon the batter onto a cookie sheet. The original recipe also suggests using an insulated cookie sheet. I like to bake them till they crisp and turn darker around the edges.  These are very simple and come out like a cross between a cake and a cookie. Very civilized for a simple something to go with a warm drink or iced drinks. You can even substitute Truvia for sugar and lower the calories even further.

© 2016 by Tom King